Deep Sentinel Guards analyze and intervene with event-based monitoring and the Deep Sentinel Apps enable quick notification and review of key events.
Adding a Network Video Recorder (NVR) provides the ability to record and access footage 24/7, view multiple camera feeds in real-time, monitor video on a large display, and allow for deep analysis such as zooming in on details. Additionally, an NVR on-premises has the benefit of ensuring that footage is recorded during an internet service outage when events cannot be routed to the Deep Sentinel Guards.
***We recommend that anytime you have a setup where you are mixing 3rd party cameras that are not going to be connected to the Deep Sentinel software to set up the network separately and then boot up the DS system and ensure all the cameras working properly. Then, join them in the primary network. Otherwise, create VLANS to separate the networks so they are not fighting among themselves.
The Deep Sentinel PoE Cameras meet ONVIF standards, so they can be connected to a wide range of NVR models. This critical feature allows the same set of Cameras to provide feeds for proactive monitoring by Deep Sentinel Guards and 24/7 surveillance recording. Avoiding the need to deploy two separate sets of Cameras and the associated installation labor is cost-effective.

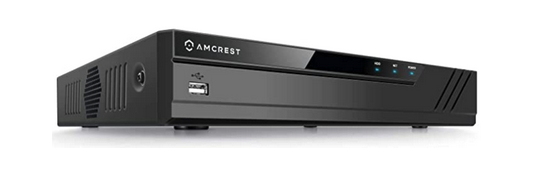
Choice of NVR
NVR models are available for all needs and budgets. The equipment is typically not sold with included storage so you can tailor the capacity to your needs.
The amount of storage will depend on the number of Cameras, how many days of footage you want to record, video resolution, and the frame rate. Storage space can be saved by setting a schedule to record only certain timeframes and adjusting the video resolution.
Security NVR storage calculators are available online to help determine requirements before purchasing hard drives.
Remember you can select some or all of your Deep Sentinel Cameras to record to the NVR. If you have existing network Cameras (non-Deep Sentinel) these can be pointed to the NVR alongside the Deep Sentinel Cameras. Only the Deep Sentinel Cameras will route events in real-time to the Guards. When selecting an NVR, make sure it has enough IP channels to connect the corresponding number of Cameras you intend to record. Most NVR models support recording and managing 16 cameras, but some lower-cost models can only support 4 or 8.
If you plan to view Camera feeds on a large screen, then select an NVR with an HDMI or VGA video output. Some models allow adjustment of the display sequence of channels so you can configure it based on your property.
NVR Integration
Deep Sentinel recommends setting up and testing the PoE System fully before adding the NVR. This is so you can verify performance and fine-tune before adding new equipment.
As noted earlier, Deep Sentinel Cameras are ONVIF compatible. In most cases, ONVIF compatible Cameras will be able to communicate with an NVR that is also ONVIF compatible. This means that you are guaranteed to get video output from each Deep Sentinel Camera.
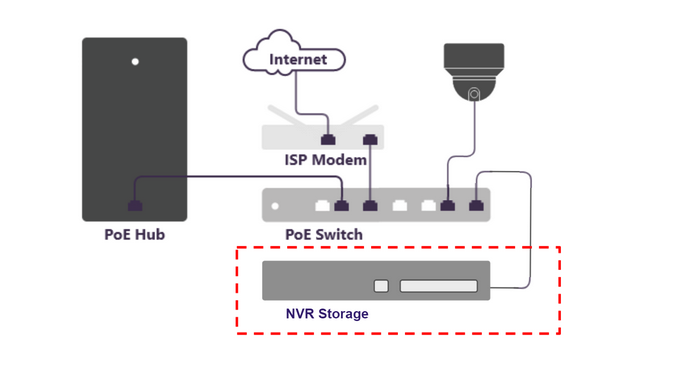
Adding the NVR does not have an impact on the Ethernet network cables connecting to each Camera. The Cameras will continue to be connected to the PoE switch. We do not recommend connecting the Cameras to the NVR even if it has a built-in PoE Switch as this can create a separate network.
Connect the NVR to the same local network as the PoE Switch, Deep Sentinel Hub, and Cameras. This can be through the PoE Switch used by the Deep Sentinel Cameras, but the NVR connects to AC mains power directly (it does not depend on PoE for power).
Camera Setup with NVR
The actual setup process may vary slightly depending on the make and model of the NVR. Below is a general guide, so please refer to the User Manual provided with your NVR for specific instructions.
Important: Deep Sentinel camera settings can be changed remotely by some NVRs. It is also possible to navigate to the camera firmware by IP address, enter the credentials and make changes to the settings. Do not make any changes to the ‘deepsentinel' user account in the camera firmware. Changing Camera settings may impact performance or make cameras inoperable with the Deep Sentinel PoE system.
Before starting, ensure the network is valid and correct. If Deep Sentinel cameras are offline or there are other network issues, the cameras will not connect to the NVR.
- Add the online Deep Sentinel Cameras to the NVR using the NVR interface.
- Most NVRs will automatically detect Cameras on the local network.
- If you do not see the target Deep Sentinel Camera listed, you can enter the IP address manually. There are third-party programs and apps for searching ONVIF devices on the local network. You can also search using your router's interface or app if this is easier.
- Enter the username & password for the Deep Sentinel Cameras.
For older deep sentinel cameras (Tiandy): Username: admin and password: deepS3ntin3l
For newer deep sentinel cameras (Uniview): Username: deepsentinel and password: deepS3ntin3l_ - If given the option of choosing the communications protocol, select ONVIF (see illustration below).
- Configure and apply recording settings for each Camera.
- Finish setup and connect the auxiliary monitor for Live View if needed.
- Test each Deep Sentinel Camera by walking in front of it to verify a new event is created and Escalated to the Guards for review. Check this using the Deep Sentinel app.

Reserve Camera IP Addresses (recommended setup)
The router steers traffic to all the devices on the local network including the PoE Hub, NVR, and the Cameras. If the router resets, either because of a technical issue or a loss of power, then the IP addresses of the local network can be renewed. When this occurs, it can mean the Camera IP addresses are changed and need to be remapped to the NVR.
To prevent this from happening, Deep Sentinel recommends reserving the IP addresses. This is achieved by changes in the firmware of the router that is assigning the addresses. Changes to firmware settings can be made by logging into the router via a web browser or if the router has an app you may be able access through this also.
The exact steps vary between router manufacturers so consult the support documentation that is specific to your make and model. Below are instructions for some of the more common brands. NOTE: You may need to disable DHCP IP reservations if this is a separate setting on your router.
Before starting, make sure that you know the IP address of each camera. You can get this information from the Router firmware or a computer on the local network.
Eero Routers
In the Eero app, go to Network Settings / Advanced settings / Reservations and Port Forwarding / Add a reservation. Select the Camera and either give it a new IP or keep it at the current one. Click Save. If you change the IP, then restart the camera and it'll come back with the newly reserved IP address
TP-Link Wireless Routers
Use a web browser from a computer or mobile device on the local network to access the settings. Click DHCP->Address Reservation on the left side and click Add New button. Enter the MAC address and IP address of the Camera and check that enabled is selected. Press Save.
Orbi
Use a web browser from a computer or mobile device on the local network to access the settings. Select advanced / Setup / LAN Setup. In the Address Reservation section of the page, click the Add button. In the IP Address field, type the IP address to assign to the computer or server. The page adjusts. Enter an IP address.
Google Wifi
In the Google Home app, tap WiFi / Settings/ Advanced Networking. Tap DHCP IP reservations / Add IP reservations. Tap the device (Camera) for which you want to assign a static address. Enter an address and then press save.