This guide will walk you through setting up BYOC (Bring Your Own Camera) cameras for use with the POE hub (see list of supported cameras). While the instructions below specifically reference Uniview cameras, the general setup process applies to all BYOC-compatible cameras. If you're using a different approved camera model, some steps may vary.
It is strongly recommended to setup all cameras and test them before installing them. For more information, see How to Perform a Bench Test.
For model-specific instructions, refer to the guides below:
- Dahua Cameras
- Hikvision/LTS Cameras (note: see also updated instructions)
- Luma Cameras (note: may require updated firmware to fix audio)
- Invid Cameras (note: may require updated firmware to fix motion detection)
- Hanwha Cameras
- Digital Watchdog Cameras
- Vitek Cameras
- Geovision Cameras
- Avigilon Cameras
- Homaxi Cameras
- IC Realtime Cameras
- Ubiquiti / Unifi Cameras
- Cortex Cameras
- Uniview/Uniarch Wireless Camera (Uho-B2D-M5F4D-NB)
- Axis Cameras
- TVT Cameras (note: may require updated firmware to fix motion detection)
NOTE: If your camera has PTZ (Pan/Tilt/Zoom) capabilities, please also review the PTZ Camera Best Practices.
Follow the steps below to get your BYOC camera up and running with your Deep Sentinel POE hub:
Pre-requisites
- One POE hub and at least one BYOC camera.
-
A POE switch connected to the internet
-
A Windows laptop or a PC
-
Software Onvif Device Manager (download) installed on the laptop/PC
-
At least 3 Ethernet Cables, one for POE switch, one for laptop/PC, and one for every camera
-
Wire your laptop/PC to the POE switch, and your POE hub to the POE switch
-
Wire your camera to the POE switch
-
Waiting for 30 seconds for camera to boot
1. Find the IP address of each camera
-
-
Open Onvif Device Manager (see step 4 above)
- Click “Refresh” in the bottom to search for cameras
- Find each camera in the list, then note each IP address you plan to install.

-
2. One by one proceed to the camera login by typing the IP address of the camera into the internet browser search bar.
-
-
If the camera is brand new enter the default account/password: “admin/123456” then press “login” It will prompt you to change the password of this camera. Please use something that you will remember in the future. If this is an existing camera please use the current admin username and password
- Log into the camera with the new username/password.

-
-
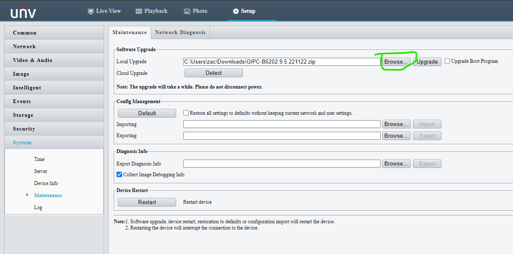
- Click "System" → Click "Maintenance"
- Use the Cloud Upgrade Option (Detect button)
- We have a few firmware versions available for download in the article: Supported Cameras for Third-Party Camera Integration (BYOC)
- If using downloaded firmware, use Local Upgrade. Click "Browse..." > Select the ZIP file > Upgrade
4. Factory reset the camera
-
- Click “System”, then click “Maintenance”
- Tick “Restore all setting to default….“
-
Click “Default“ to do factory reset
-
The reset process will take about 5 mins until you can find the camera IP from Onvif device manager.

-
- Log back into the camera
- Navigate to Security > User > Add
- in “Username”, input “deepsentinel”
- in "User Type", select "Operator"
- in “Password”, input “deepS3ntin3l_”
- in “Confirm”, input “deepS3ntin3l_”
- in “Select Permission”, select all checkboxes
- Click “OK”, then confirm the deepsentinel user in the User list

6. Setup Video and Audio Settings
-
- Navigate to Video & Audio > Video
- Confirm settings match the below. Video compression must be set to H.264

- Confirm settings match the below. Video compression must be set to H.264
-
Navigate to Video & Audio > Audio
-
Confirm settings match the below.
-
Set Audio Output to Speaker based on if you are planning on using the built-in camera speaker
- Set Audio Output to Line if you are planning on using an external speaker or bullhorn

- Ensure Microphone checkbox is enabled.
- Click “Save”
-
- Navigate to Events > Common Alarm
- Ensure Motion Detection is set to On
- Ensure Sensitivity is set to 60 (you can set this to 90 if monitoring a parking lot or large open area)
- Ensure Suppress Alarm is set to 5
- Click Save

- Navigate to Video & Audio > Video
7. This camera is now ready to pair with your Deep Sentinel Hub.
-
- Please confirm before leaving this section that the camera has paired and that live view and guard escalation is working in the Deep Sentinel App.
- Ensure that a guard can see and hear you during the guard intervention. If the camera is able to pair but the audio or video quality is bad please check the settings.
If you are using an NVR, please be aware that some of the above settings could be automatically updated by your NVR which can cause compatibility issues with the Deep Sentinel Hub.
Deep Sentinel has certified the UNV NVR502-B-P Series. See here for more information on setting up your NVR502.
If you experience issues with the NVR changing settings:
- Add a user to the cameras with limited permissions. Use this new user when setting up the cameras on the NVR instead of "admin" or "deepsentinel"
- When setting up the cameras on the NVR, use a non-ONVIF protocol such as "custom" or "RTSP"
- Go through the camera settings on the NVR to ensure iit matches the other settings in this article. Specifically, check the motion detection settings and video/audio codec settings.
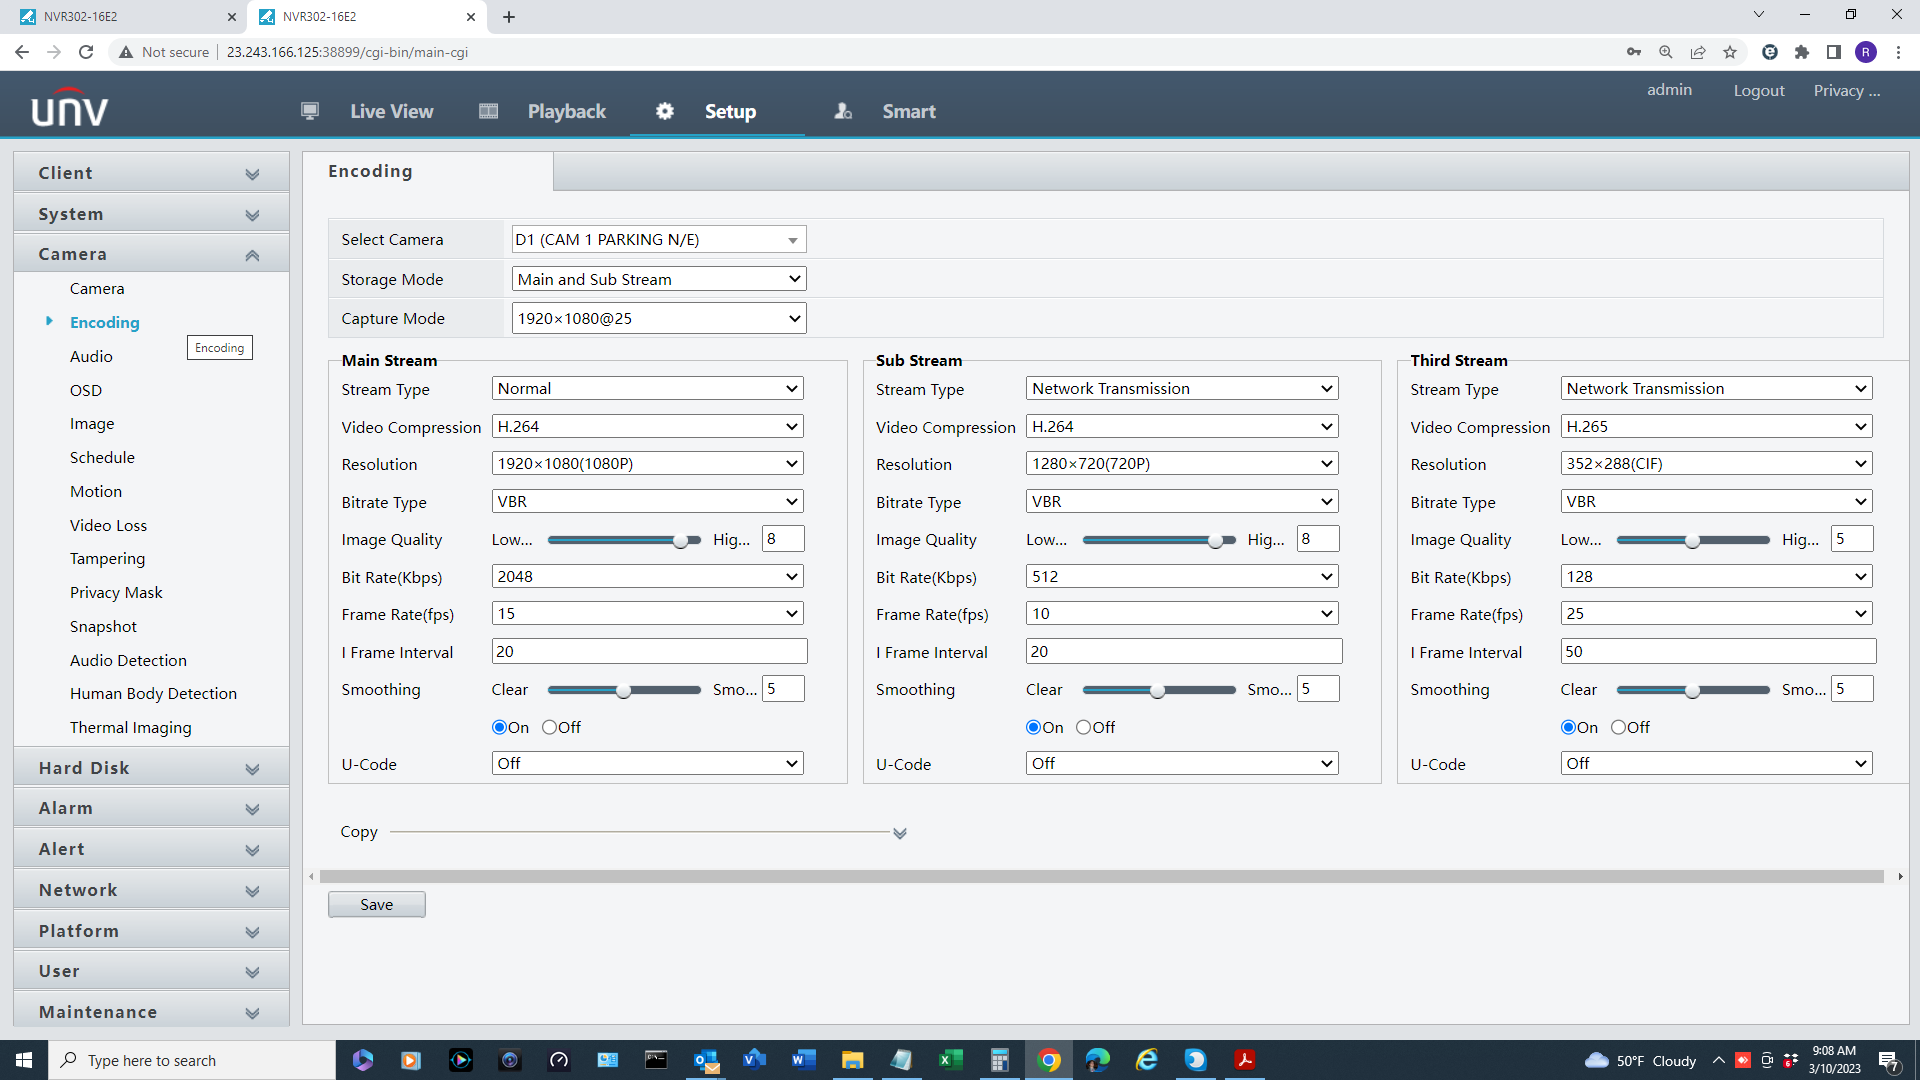
The below encoding settings work well with both Deep Sentinel and Uniview NVR.