The objective of this document is to provide guidelines for camera mounting. It includes the following sections:
- Background information
- Camera mounting guidelines
- Resources with related and relevant information
Background Information
- The working range of the camera is 50 ft.
- The performance of the camera and AI algorithm diminishes with distance.
- The maximum lateral distance diminishes with increasing camera height.
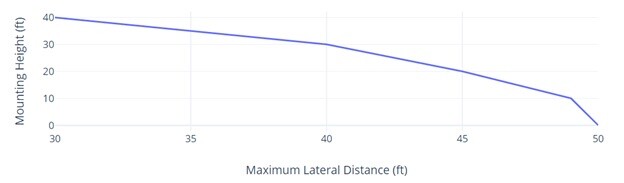
Figure 1 displays the relationship between camera height, ground distance (lateral distance), and effective camera range.

Figure 1: Relationship between camera height, lateral distance, and camera range
Table 1 shows the effect of increasing camera height on lateral distance in tabular format.
Table 1: Camera height vs. Maximum lateral distance
Camera Mounting Guidelines
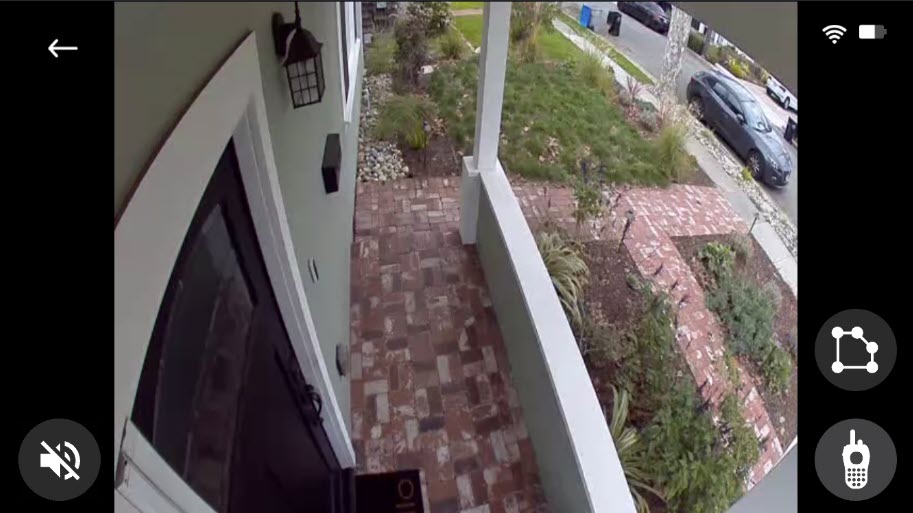
- The optimal camera height varies by location and performance. For best performance, mount the camera as low as possible, ideally just out of striking distance (8-12 ft.). This height is low enough to capture fine details but high enough to be out of the easy reach of thieves and vandals.
- Tilt the camera down (15 to 25 degrees) for best motion sensor performance.
- The camera motion sensor is most sensitive to side-to-side movement within the field of view. Therefore try to position the camera so that subjects walk across the field of view (side-to-side) rather than towards or away from the camera.
- Place cameras where they can view the space you want to be kept under surveillance.
- Any Camera monitoring an entry should ideally show the following:
- Entrances: so that guards can see persons entering and leaving.
- Door handle/lock: so that Guards observe how persons gain access.
- Exterior approach to the entrance: Important for two reasons a) it allows the camera time “wake up” as persons approach the entry, and b) it allows the guards to see the direction persons approached from and if they are loitering.
 Setup cameras to exclude environmental factors
Do not include a busy road or sidewalk in the Camera’s field of view. Private driveways are OK.
Where possible, do not point the Camera at items that move in the wind. This includes large branches, flags, or swings.
If these are unavoidable, use the Protection Zone feature to exclude them.
Poor Camera placement creates a confusing view, therefore avoid the following:- Small or Far Away Objects: Don’t attempt to monitor the entire perimeter. The camera will have difficulty identifying small or far away objects. Move the camera to cover what matters and angle the camera down to focus more on the entryways.
- Partially obscured objects: the AI works best when it can see the whole object. Ensure entryways are not obscured, and the camera can see a person walking up.
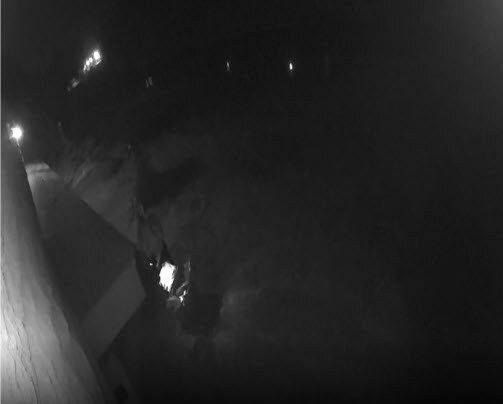
- Poor placement with inadequate lighting: If the camera is mounted too high, the entryway will not have adequate lighting to identify objects. Move the camera or adjust the lighting so that people in critical areas can be identified.
- Any Camera monitoring an entry should ideally show the following:
- To ensure that camera placement does not create blind spots, verify the view from the camera on the DS app during or after installation.
- Any unnecessary objects that could obstruct the camera’s Field of View (FOV) should be removed.
- Don't point cameras directly at the sun. Bright light causes glare and high contrast in your footage and will affect the performance of the AI.
- Wireless cameras
- Ensure that the camera has sufficient signal strength. Generally, signals at -60 dBm or stronger are excellent, while signals lower than -80 dBm are considered weak and will not provide reliable service. You can see the approximate wireless signal on the DS app. It is represented in a simple bar chart. During camera setup, the RSSI is displayed, and installers can check using the app Debug Mode at any time.
- Avoid placing wireless cameras near objects such as metal, concrete walls, plaster, ceramic tile, windows/tinted glasses, and drywall, as these materials attenuate WiFi signals.
